How Can We Help?
Self Check In
Self-Checkin – Faith Teams offers a self-check-in feature for your people to check into events and services. The feature is available using the Faith Teams Mobile app.
Prerequisites
- An Event on the calendar
- Locations / Classes Setup for the Event
-
-
- Note – If the event is part of an “Event Series,” the system will allow you to limit which classes are available for check-in. This is very helpful for your volunteers, but also even more helpful during self-check-in. We highly recommend making any event for self-check-in part of an Event Series for this reason.
-
- Your Students / People need to be in your Database. They will look up their family by the last 4 digits of one of the family members’ phone numbers. So it is important to have a phone number on file, and have your people connected as a family (i.e., Mom/Dad & Children)
- Tags for your students, children, or people checking in. If your people are pre-tagged, and the Tag is connected to a specific Location/Class, then Faith Teams can automatically place people in the correct Location/Class on check-in.
- Printer & Labels- Faith Teams Self Checkin allows for student and parent labels to be printed on Apple iPad and iPhone. Brother QL-810W and QL-820NWB are currently supported. They are widely available. Labels should be 2.4” x 3.9”. Here is a link to labels which work well, and are well priced: https://www.amazon.com/dp/B073P734JZ?th=1
- iPad & Stand
- User Permissions – to set up the device for self-check-in, the user will need People and Event access on Faith Teams. The device app can be “locked” in a Kiosk mode
- Lock the App
- Lock the Device (System)
- Secure the Device (Physical)
How to Set Up the Self-Checkin Station
- Log in to the Faith Teams Mobile App
- Tap the Menu in the top left, and tap “Events”
- Tap the data on the calendar to show the events for that day
- Tap the event you wish to set up self-check-in
- Tap the “Setup Self Checkin Station” item
Location Settings
Set up Eligible Locations / Classes
To setup which Locations / Classes are available for this event, tap the “Gear” icon (top right). Tap the “Allow Checkins” slider for any Location / Class you wish to allow people to check in to for this event. * This will be stored on the Event Series, so future check-ins will remember your selection.
Set up Default Location / Class
To set up a default Location / Class, tap the “Default” slider. This will auto-default a person into this location is Faith Teams is not able to determine a class from Tags.
Select Your Printer
Faith Teams Mobile supports only 2 printers:
- Brother QL-810W
- QL-820NWB
Required Labels
The printer must be loaded with 2.4” x 3.9” labels. For Faith Teams mobile to be able to find your printer, both your iPad/iPhone & the Brother printer must be on the same WiFi network. For any details on getting your devices onto the WiFi network, please work with your church network administrator, and/or consult the manufacturer for your device. Faith Teams cannot help you troubleshoot WiFi or device issues.
Once your devices are each connected to the WiFi, you can then connect to the printer. Once selected, it will show a “Printer Address” successfully. You should only have to select this once when setting up your Self-Check-In Event, and it should stay connected during your event.
Configure Your Labels
Tap the gear icon next to any Location / Class to set up your Configure your Label Settings. Each location has its own label options. In this way, you can allow some locations to print a label while others do not. You can also customize certain aspects of the label:
Print labels upon Check In – when checked, it will print labels when someone checks into this location.
Print Parent/Security Label – when checked, it will print a parent label that has a short matching security token (4 digits) that matches the child label.
Fields for Child Label – You can add up to 3 optional fields to print on the label from the person’s profile, including custom fields.
Checkout Options – You can set up “Checkouts” for the Location. This allows you to mark the student as having been “Checked Out”. This is good for updating the system that the child was successfully picked up by the parent/guardian. You can also require the system to capture the name of the person picking up the child before checkout.
Required Fields – You can enforce that all people checking into a Location have a certain minimum set of fields filled out on their profile before it allows them to be checked in. For example, you may require information about any allergies or special needs to be acknowledged before check-in to a location.
Lock the App & Device
There is a lock icon at the top of the screen to lock the app to the Self Checkin screen. Tap this icon, set a 4-digit PIN to secure the app, and ensure your guests are not navigating through the app. You will additionally need to lock the System using a feature such as Guided Access to ensure that only the Faith Teams Mobile app is available to your guests on the device. This is an operating system level feature, and is not part of the Faith Teams software.
Additionally, securing the device physically is recommended. We are fans of Bouncepad, but there are other places you can get a great stand for your church:
http://bouncepad.com
https://amazon.com
After you click “Label Settings”, you’ll see these options:
- Print Labels upon Checkin for this Class?
- Allow Checkouts for this Class?
- Require certain information is captured for Checkin?
Check In
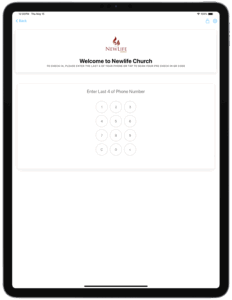
The guest will type in the last 4 digits of his/her phone number (it can be the last 4 of any family member’s phone number). Faith Teams will show the family and allow check-in for each family member.
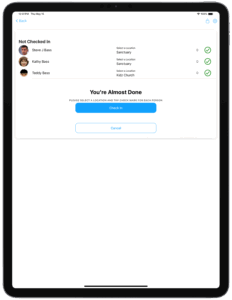
Location / Class
Faith Teams will attempt to select the class if the person is properly tagged, and the tag is linked to the location/class. If not, the person will need to select a location if a default location is not selected.
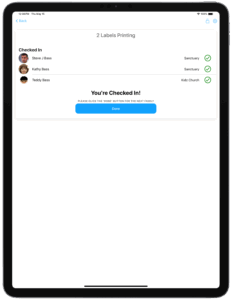
Finalize Checkin
Finally, the person will need to tap the “check-in” icon for each person and the “Check In” button at the bottom of the screen. Any labels that need to be printed will be sent to the printer for printing.